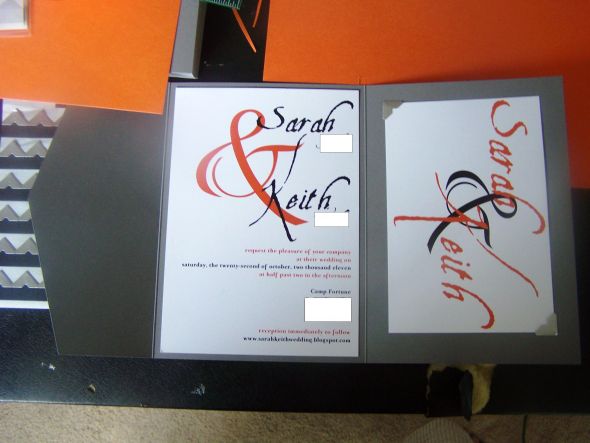
I've wanted to show you guys these the moment they came home with me and I did fifteen of them the first night. I forced myself to wait though, until our lovely guests (especially the ones who read this blog!), received this in their mailbox before posting it here. I have been working on these since February - the amount of time and effort spent on these was kind of ridiculous, but I firmly believe every bride has one area of the wedding they end up going a little crazy over. And my area? Definitely invitations. I love these - they are really my babies. I can't believe I had to send them away! (sigh, sniff, sob).
These invitations were semi-DYI: I ordered the orange envelopes (tangleo) and 5x7 gray (storm) z-card from Envelopments. Kamie actually designed the actual invitation/RSVP/monogram tags (and did a FANTASTIC job. Seriously. She should really do this for a living) and I had them printed and cut. All assembly was by yours truly.
The Process:
The Process:
The envelopes...not a good photograph but they have this amazing shimmer. I will be printing our guests' addresses directly on them:
When you first open the envelope, our guests will see this. Yep, no inner envelope. Or envelope liner. Eff you, Emily Post!
Take it out of the envelope, and you get this: a 5x7 z-card (basically, a pocketfold without the actual pocket, I’ll get to why I did that in a second). I made a 2x2 monogram of our first initials and attached it to a piece of orange cardstock with double sided tape. The sheer orange ribbon is attached between the layers, again with just double sided tape.
When you take off the ribbon tag, and open the Z-Card, you have the actual invitation. I couldn’t find ANYTHING pre-made that wasn’t too froo-froo or girly. Nothing that spoke to Keith and I as a couple or with our style. See the reason why I didn’t get the pocket? In an effort to keep down costs and pieces of paper, all I have is the RSVP. All other information (hotels, directions, etc) can be found on our website. I attached the RSVP to the z-card with self-adhesive silver photo mount corners. I also just attached the invitation to the card with double sided tape.

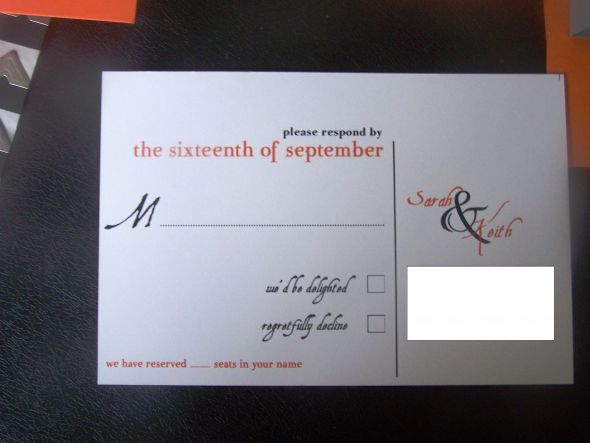
The RSVP is a 4x6 postcard. On the front:
And the back:

We went through and added the # of seats (in black) to each RSVP. In retrospect, I should have gone through and added up how many I needed to print with “1” or “2” or whatever else, and had them printed on. Ah well.
Issues:
I TOTALLY underestimated the cost of the supplies - the ribbon, tape and cardstock - needed to complete these. I thought for sure 1 roll of tape and maybe two rolls of ribbon would do me 65 invitations. I was SO wrong. It took me (this is a rough estimate, I completely lost track) about 5 rolls of tape, 4 rolls of ribbon, and another 5 pieces of cardstock. It felt as if I was running to Michaels every few days to buy more supplies. I haven't included the tape in the cost breakdown, because frankly, it makes me sick to think about it. If I say it's not in the budget, ITS NOT THERE LA LA LA.
Three last minute invitations came in when Harry finally gave me addresses for Keith's mom's side of the family - and thankfully I had just enough supplies for those extra three.
One last unexpected expense was the printing of addresses on the envelopes. I tried on my home printer, failed miserably, and then completely ran out of toner. I jumped on my computer and fired off an email to the vendor I got my supplies and printing from, and for .40 per envelope, my problem was solved.
Postage:
These bad babies weighed in at 40 grams. Heartbreaking, considering "regular" mail is considered 30 grams and below, and once you go over that magical threshold, your postage pretty much doubles - from .59 to 1.03! I nearly had a heart attack when I heard the final price, but Harry - bless his heart - paid all of our postage costs for us. So grateful for him covering the cost - 115$. (I KNOW. Don't tell me, I'm in my happy place. HAPPY PLAAAAAAACE.)
Cost breakdown:
All told, these were slightly pricey (even though the lovely Martha said I had 350$ for invitations, so really, I was way under budget. Really), but I love them! I totally think they look way more expensive than they actually are.
For the envelopes: 65 x 1.10 = 71.50$
The Z-cards: 65 x .60 = 39.00$
All printing: 46.50$
Ribbon: 10$
Cardstock: 5$
Photo corners: 6.69$ for 210.
Cutting of all three (to reduce costs I had both the RSVP & actual invitation printed 2 on a 8.5x11, and 20 monograms on 3 sheets): 5.00$
All printing: 46.50$
Ribbon: 10$
Cardstock: 5$
Photo corners: 6.69$ for 210.
Cutting of all three (to reduce costs I had both the RSVP & actual invitation printed 2 on a 8.5x11, and 20 monograms on 3 sheets): 5.00$
Printing of reply & guest addresses: 65 x .40 = 26$
Total cost: 209.69$
Total cost per invitation (65): 3.22$
Total cost per invitation (65): 3.22$
Did you have any budget busters while planning your wedding?
3 comments:
Those are BEAUTIFUL! Great job!
I definitely thought my invitations were going to be cheaper than they were, especially because I didn't pay for the design. But they were still pretty pricey. Especially when you factor in postage!
They're gorgeous! $3.22 per is not bad at all.
Post a Comment